Entering Information into pre-filled fields in a template before sending
I am new to DocuSign. I created a template using a combination of pre-fill tools and standard tools. I want our intake worker to be able to fill in the pre-filled tool elements (such as client name) before sending it out to the parent/guardian for signature. I tried to test it and I couldn’t figure out how to enter the client information into the field. Any guidance or tutorials would be appreciated.
Page 1 / 1
Hello, @Lucine Center
Welcome to the DocuSign Community!
The pre-filled fields cannot be edited by the signers, it’s read only.
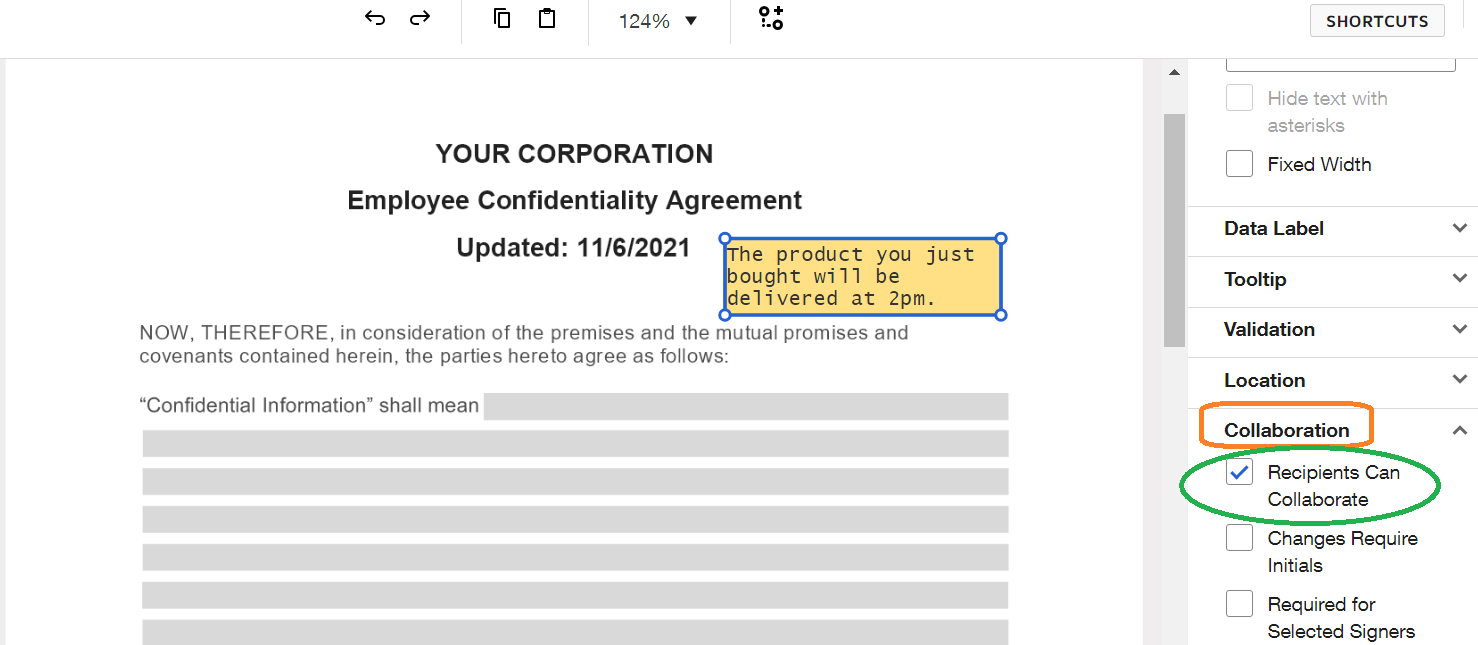
However, to achieve your goal, you could add a Text field, type your text or comment in the field then enable the property Collaboration permitting to your signers write on the text field, you can also require initials to confirm any changes they do. In the History of the envelope you’ll see the original text and the changed text by the signer.
I hope that helps!
Alexandre
Thank you so much. I should clarify, the clinician using the template is not a signer, they are a user and I have shared the template with them. I want them to fill our pre-fill fields in template before sending document out for signature.
Hi @Lucine Center,
I hope you are doing well.
I would like to confirm if you were able to solve your issue by utilizing the solution that was suggested or if the information that was provided was useful.
If so, please mark it as the best answer by clicking “Select as Best” to make it easier for other users to find.
Otherwise, feel free to let me know and I will gladly help you address the situation as soon as possible.
Best regards,
Christopher | Docusign Community Moderator
"Select as Best" below if you find the answer a valid solution to your issue.
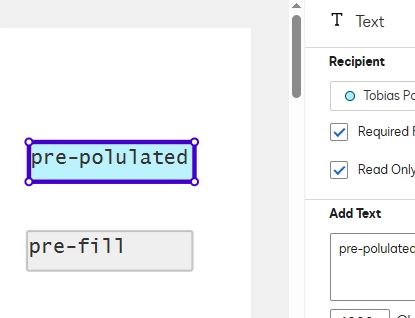
What is the difference between standard fields with “Read Only” and these new pre-fill tools?
Hello @TobiasVC-DS,
Thank you for reaching out, and welcome to the Docusign Community! We appreciate your question and assure you that we are fully committed to providing you with the best service possible. For your reference here are the relevant articles for your concern.
You can add the following standard fields to your documents:
Note: Some advanced features are available only in certain Docusign plans. Your plan might not support all the options discussed here. For details on what's available for your account, contact your account administrator or Customer Support through the Contact Support page.
EXAMPLE
If you're sending a purchase agreement for a custom-built car, the document will include the vehicle specs and the customer's contact details. You'll need the customer’s initials on the specs, their signature, and the delivery location. Use the Initial and Sign Here fields for their initials and signature, and the Text field for the delivery location.
Set field properties
Some fields automatically populate with the signer's data, while others require the signer to enter some information or make a choice. When you add fields to a document, you can define field properties, such as font styling and character limits.
Adjust the field size
You can easily adjust the size of your field; just select and drag on any of the sizing handles at the corners of the field:
Types of fields
Signature. New users confirm their name and initials, choose a signature style, and apply it to the field. After setup, the signature is applied with a single click. The signing name matches the recipient name that you entered. Default: Required.
Initial. Just like signing, new users first adopt a signature, and their initials are applied to the document. Default: Required.
Stamp. The stamp field helps customers add a stamped image for their signature, approval, or organization acknowledgment. Recipients upload, size, and position the stamp image or select a saved stamp. They can resize or replace it before completing the document. Default: Required.
The stamp field must be enabled for your account by your account administrator in the Sending Settings guide.
Date Signed. This field is automatically completed with the current date. Your account administrator can set the date format. The format can include a time stamp.
Text. This is a free text field for data. By default, it accepts any characters. You can set a character limit, hide text with asterisks, or fix the field size. Use the Validation option to validate Text field data. To apply validation, place the field on your document, select it, and choose the format from the Validation section in the properties pane.
Tip: You can verify data with apps. Third-party apps power our new Data Verification fields. They verify the data entered into them in real-time as signers are completing an envelope. Find them in the Custom Fields pane. For more information, check out the Data Verification guide.
Default: Required; Validation - None.
Number. The number field offers an easy way to input numbers with features like currency symbols, number formatting, minimum and maximum values, and negative value styling.
Name. This name field supports first name, last name, or full name formats. Place the field on your document and choose the format in the properties panel. For the first name, the first word is used. For the last name, the last word is used. The field auto-fills with the recipient's name as entered. If the recipient changes their name when adopting their signature, the field updates to show the new name. Default: Full Name.
Company. This field auto-fills with the recipient's organization name based on their preferences. If the recipient has no Docusign account or hasn't specified an organization name, the field is blank and can be completed manually.
Title. Like the Company field, the Title field automatically populates with the recipient's title based on their My Identity information. Otherwise, the recipient can type in their title.
Email. This field automatically populates with the recipient's email address.
Checkbox. This is a standard, square box for recipients to select one or more options. You can add a single box or a group of multiple boxes. A checkbox group can include a validation rule to enforce how many checkboxes in the group your signer must select. Checkboxes can be required or optional, but the field becomes required if you apply validation that requires the signer to select a certain number of boxes. For more information, check out the Checkbox Fields guide.
Tip: If you have a scenario where your recipient must mark to indicate explicit agreement, use a single checkbox and select the Required Field option.
Radio. Radio buttons help recipients to select only one option from a group. You can add, remove, or reposition individual buttons. Initially, a Radio field has two options. Use the "+" icon to add more.
Radio buttons have these properties:
Group Label. Identifies the option group (not shown to recipients).
Radio Button Values. Displayed to recipients. The values are unique and representative. Only the selected option displays in the completed PDF, displaying as an "x". Default: "Radio1" "Radio2". Values for each option are shown to recipients and the selected value is included when you download form data for the document.
Group Tooltip. Optional text is shown when recipients hover over or select an option.
Radio buttons can be required or optional. If set as required, recipients must select an option to complete signing. Default: Required.
If you have a scenario where your recipient must mark to indicate explicit agreement, use a single checkbox with validation.
Tip: Recipients navigate through fields based on your account's Auto-Navigation setting. For a smoother signing experience with radio buttons, use the option to navigate blank required fields. This setting is configured by your Docusign administrator. For more information, check out the Signing Settings guide.
Dropdown. This field offers a dropdown list where recipients can select only one value. The Options section opens on the properties panel when you place the field.
Create dropdown options by choosing LIST or SERIES:
LIST: Add options using + ADD OPTION and complete the values. Avoid using semicolons as they split entries.
SERIES: Enter a semicolon-separated list of values directly.
The Default option list helps you choose a default value and set additional properties like formatting and requirement status. The dropdown field can be required or optional. If required, recipients must select an option to complete the document. Default: Required.
Attachment. The Attachment field helps you request additional documentation, which recipients can upload or fax. If set as required, they must attach a document to complete signing. The attachment will be included in the final document and can be downloaded or printed. Default: Required.
Note. The Note field is a free text field that you can use to enter additional information for your recipients. You can add a note for an individual recipient and the text that you enter displays only during the signing session. Notes are visible only to their assigned recipient. Notes do not remain on the completed documents. However, you can use the download form data option to recall and view the information.
Approve. The Approve field provides an alternative to Signature or Initial fields for document approval and is always required. Selecting Approve signifies the recipient has signed. It doesn’t add information to the document but records an "Approved" action in the Document history. To decline the document, use the Decline field or the Decline to Sign option. You can adjust the field's name using the Button Text property.
Decline. The Decline field functions such as Decline to Sign. If selected, the remaining fields are skipped, and the recipient must provide a reason for declining. The action and reason are recorded in the Document history. Adjust the field's name using the Button Text property.
Formula. This calculated field computes results based on recipient-entered values using formulas with addition, subtraction, multiplication, and division. It supports formulas based on numbers or dates.
Envelope ID. The Envelope ID field helps you manually place and format the ID on your document, which is useful for History, Certificates, and API developers. Alternatively, use the Advanced Option to auto-stamp the ID at the top left of every page. Once added, the ID stamp is permanent and cannot be removed.
The following field types can be set to read only:
Text
Company
Title
Drop Down
Checkbox
Radio Button
Note: Even though you assign Read-only fields to a single recipient, the fields and their contents may be seen by all recipients of the document. Read-only fields cannot be edited by recipients. For more information, check out the Visibility of Read-Only Fields guide.
If you need to pre-fill certain document fields before sending, you can add pre-fill fields to the documents yourself and then complete them before you send the envelope. Pre-fill data is visible to all recipients with access to the document it is placed on.
Once the envelope is sent, as soon as a signer opens the document to view or sign, or when a carbon copy recipient receives the envelope, data entered in a pre-fill field becomes a permanent part of the document. From that point on, pre-filled data can no longer be changed, corrected, or removed.
When you enter the prepare view for your envelope, select the pencil icon on the left to access the Pre-fill Tools.
Drag the pre-fill fields you want to use onto the document. See the pre-fill field types for details.
Next, enter the values you want to use in the pre-fill fields. Select the field, then enter the value in the Field Properties panel on the right.
Finish preparing your envelope with fields and messages for signers.
Select SEND.
Your envelope is sent. The pre-fill field values becomes a permanent part of the document and cannot be changed or removed. Recipients with access to the document will see the data you entered in the pre-fill fields.
If you found the response to be a useful solution to your question, please mark it as the best answer by clicking “Select as Best” to make it easier for other users to find. Thank you!
Best regards,
Ma. Cassandra | Docusign Community Moderator
"Select as Best" below if you find the answer a valid solution to your issue
Thanks for your support. But I still don’t understand the difference:
The pre-fill field values becomes a permanent part of the document and cannot be changed or removed. Recipients with access to the document will see the data you entered in the pre-fill fields. → That’s the same as read only fields with pre-populated values, correct?
Hello @TobiasVC-DS,
I hope you are doing well.
Yes, I agree it is almost the same. In DocuSign, pre-filled fields are values the sender enters into a field before sending the envelope, and these values are visible to all recipients but cannot be edited by them. Read-only fields, on the other hand, allow the sender to pre-fill a field, and while recipients can see the value, they cannot change it either. The key difference is that pre-filled fields are pre-determined by the sender and do not update based on recipient input, while read-only fields can be pre-filled but are not editable by the recipients.
Here's a more detailed breakdown:
Pre-filled Fields:
The sender enters the value before the envelope is sent.
The value is visible to all recipients.
The recipients cannot edit the value.
Examples: Sender's name, company name, or other static information.
Read-only Fields:
The sender can enter a value before sending.
The recipients can see the pre-filled value.
The recipients cannot change the pre-filled value.
Example: An address or phone number that needs to be displayed but not edited by the recipient.
In essence:
Pre-filled fields provide a way for the sender to include specific information in the document before it's sent, and this information is finalized and cannot be changed by the recipients.
Read-only fields offer a way to ensure information is displayed for the recipient but prevents them from modifying it, which can be useful for details that need to be seen but not edited.
If you found the response to be a useful solution to your question, please mark it as the best answer by clicking “Select as Best” to make it easier for other users to find. Thank you!
Best regards,
Ma. Cassandra | Docusign Community Moderator
"Select as Best" below if you find the answer a valid solution to your issue
Hello @TobiasVC-DS,
I hope you are doing well.
I want to confirm if you were able to solve your issue by utilizing the suggested solution or if the information provided was useful.
Let me know, and I will gladly help you address the situation as soon as possible.
Best regards, Ma. Cassandra | Docusign Community Moderator
"Select as Best" below if you find the answer a valid solution to your issue!
Thanks for explanation!
Regards
Tobias
Hello @TobiasVC-DS,
Let me know if you still need additional assistance or if you found the response to be a useful solution to your question, please mark it as the best answer by clicking “Select as Best” to make it easier for other users to find.
Thank you!
Best regards,
Ma. Cassandra | Docusign Community Moderator
"Select as Best" below if you find the answer a valid solution to your issue
You can login or register as either a Docusign customer or developer. If you don’t already have a Docusign customer or developer account, you can create one for free when registering.
You can login or register as either a Docusign customer or developer. If you don’t already have a Docusign customer or developer account, you can create one for free when registering.
 Back to Docusign.com