Hello I am using Docusign eSignature and DocGen. We have the Docusign enterprise pro for salesforce plan.
Is it possible to group two checkboxes created in the Document Custom Fields section? I have created these and inserted them into the template but they act independently of each other. I need the person filling out the form to check either one option or the other, but not be able to select both.
Also, I am having an issue when inserting a custom field for Title that the end user should fill in as it does not line up with where the tag is placed on the template. It seems that anytime I insert a field that the end-user has the ability to write-in, they are not aligned properly and require manual intervention.
Best answer by Ma.Cubio
Hello @Carlos.Bres-Enriquez,
Thank you for reaching out, and welcome to the Docusign Community! We appreciate your question and assure you that we are fully committed to providing you with the best service possible.
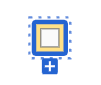
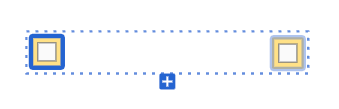
When you add a checkbox, click on the little plus icon underneath to add more check boxes to the group.
The dashed border will show you checkboxes that belong together, even if they are positioned differently.
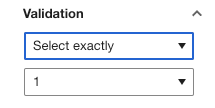
And you can configure this for the checkbox group on the righthand side under “Validation”.
Start an envelope as usual, adding documents, recipients, and messages.
In the Add Fields view, select the Custom Fields palette.
Click the + to add a new custom field.
In the Custom Field Details dialog, select the field type for your new custom field and enter a name.
Set the properties for your custom field, such as font size, validation type, or AutoPlace.
(Optional) Select Shared to allow other users on your account to use the field.
Note: You must be an admin on your Docusign account in order to share custom fields and the option to share must be enabled on the account. See Sending Settings for more information.
Once you have set all the properties for your custom field, select SAVE.
Your new field appears in the list of Custom Fields.
If you found the response to be a useful solution to your question, please mark it as the best answer by clicking “Select as Best” to make it easier for other users to find. Thank you!
Best regards,
Ma. Cassandra | Docusign Community Moderator
"Select as Best" below if you find the answer a valid solution to your issue
Thank you for reaching out, and welcome to the Docusign Community! We appreciate your question and assure you that we are fully committed to providing you with the best service possible.
When you add a checkbox, click on the little plus icon underneath to add more check boxes to the group.
The dashed border will show you checkboxes that belong together, even if they are positioned differently.
And you can configure this for the checkbox group on the righthand side under “Validation”.
Start an envelope as usual, adding documents, recipients, and messages.
In the Add Fields view, select the Custom Fields palette.
Click the + to add a new custom field.
In the Custom Field Details dialog, select the field type for your new custom field and enter a name.
Set the properties for your custom field, such as font size, validation type, or AutoPlace.
(Optional) Select Shared to allow other users on your account to use the field.
Note: You must be an admin on your Docusign account in order to share custom fields and the option to share must be enabled on the account. See Sending Settings for more information.
Once you have set all the properties for your custom field, select SAVE.
Your new field appears in the list of Custom Fields.
If you found the response to be a useful solution to your question, please mark it as the best answer by clicking “Select as Best” to make it easier for other users to find. Thank you!
Best regards,
Ma. Cassandra | Docusign Community Moderator
"Select as Best" below if you find the answer a valid solution to your issue
Hello @ntrauscht Currently, Docusign does not support saving an entire checkbox group as a single reusable “grouped custom field” object. However, you can still achieve this by:
Saving the individual checkbox fields as Custom Fields
Then creating or extending the checkbox group within the template or envelope using the “+” option under the checkbox field
Please note that the grouping behavior is configured at the template/document level, rather than stored as a reusable grouped component. For your use case, you can also set the group validation to: “Select Exactly” “1” This will ensure the signer can only select one checkbox from the group.
I hope this helps clarify things!
Best regards,
Ma. Cassandra | Docusign Community Moderator
"Select as Best" below if you find the answer a valid solution to your issue
You can login or register as either a Docusign customer or developer. If you don’t already have a Docusign customer or developer account, you can create one for free when registering.
You can login or register as either a Docusign customer or developer. If you don’t already have a Docusign customer or developer account, you can create one for free when registering.
 Back to Docusign.com