Solved

Cannot enable e-signature in power pages

  • August 13, 2024
  • 6 replies
  • 103 views

Forum|alt.badge.img+2

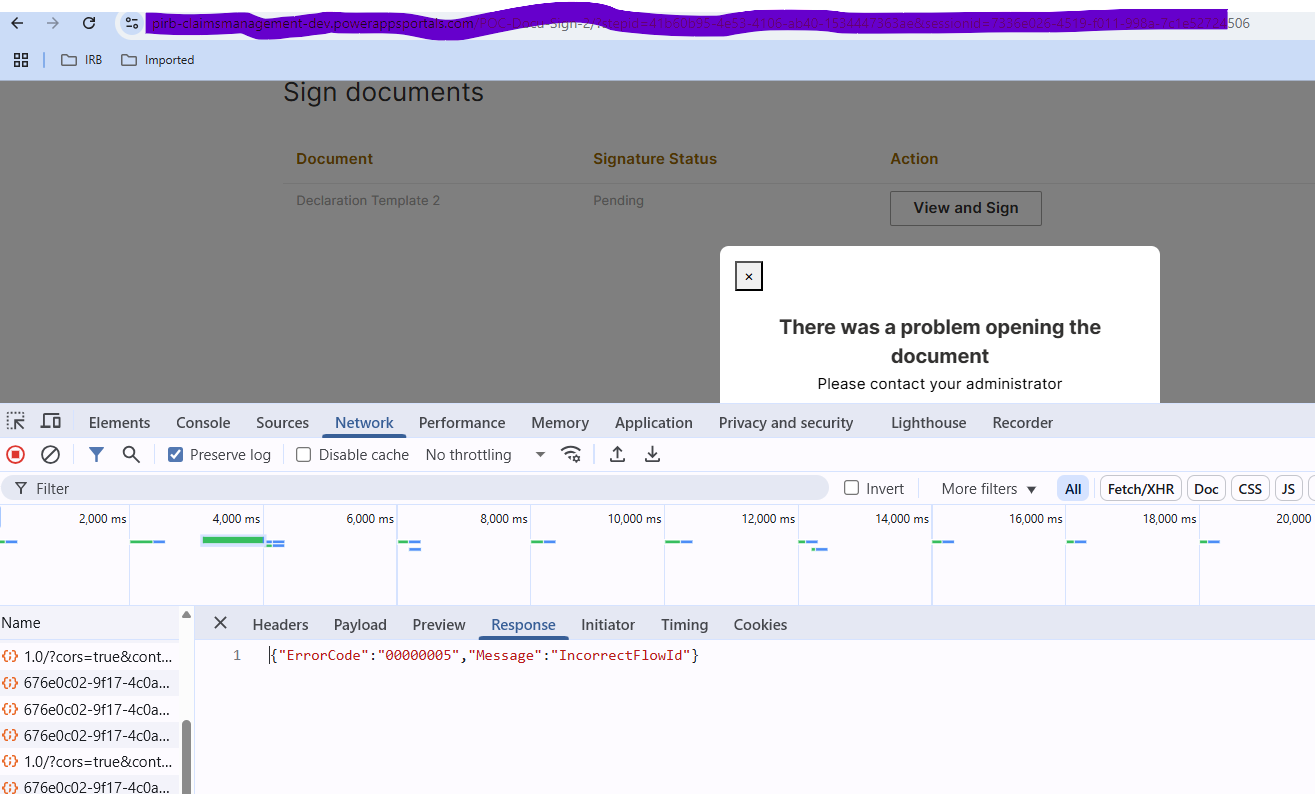
I’m having issues integrating docusign into my power pages test environment.

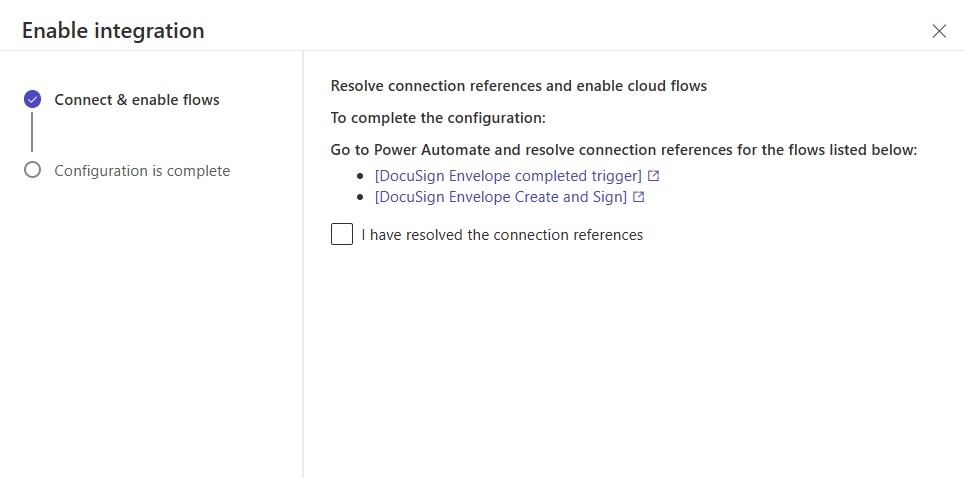
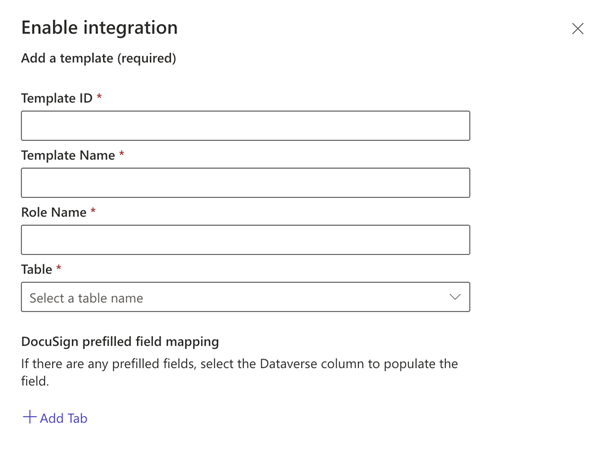
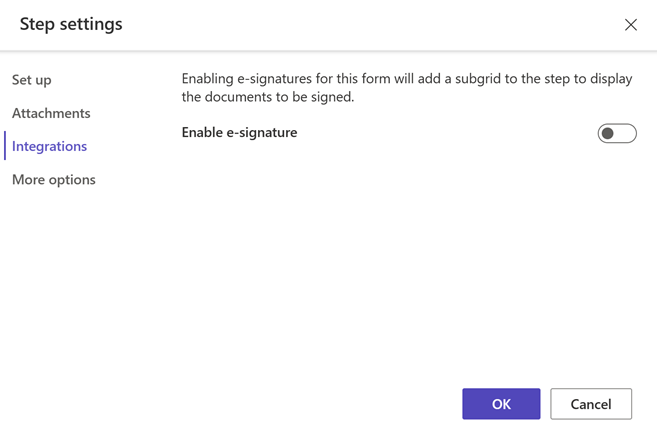
I was trying the developer account, followed the setup, but can’t enable the e-signature.
Am I missing something?

Would be grateful if anyone could help :)​​​​

Best answer by Christopher.Alpizar

Hello @FelixNie,

Thank you for reaching back, it would be best to create a case and have a Microsoft specialized support agent review your current configuration to determine the cause and provide you with a proper resolution, the case is needed because Private Identifiable Information might be needed and that information cannot be disclosed in this public forum. To open a support case in the Docusign Support Center, go to the "Get Support" section and select "Open a Support Case". Log in using your Docusign credentials and select a case subject. If you have multiple Docusign accounts, choose the appropriate account to continue. Open a case in the Docusign Support Center. If you’re not able to open a Customer Support case via the above link, you can find below the available phone numbers to contact Customer Support: 

  • Please see the following announcement regarding important changes to
    Docusign Live Inbound Phone Support:
    https://support.docusign.com/s/articles/Upcoming-Changes-to-Live-Inbound-
    Phone-Support?language=en_US

Let us know if you need further assistance.


Best regards,

Christopher | Docusign Community Moderator

"Select as Best" below if you find the answer a valid solution to your issue.

View Original
Is this content helpful?

6 replies

Forum|alt.badge.img+14

Hello @FelixNie,

Thank you for reaching out here, we want to welcome you to the Docusign Community, I appreciate you bringing your question to this Community, we are committed to providing you with the best service possible.

I apologize for any inconvenience this might cause you, to clarify was this https://learn.microsoft.com/en-us/power-pages/admin/set-up-docusign-integration, the guide that you followed?

Note: Some advanced features and options are supported only in specific Docusign plans. Your account plan might not support some of the options discussed in this help topic. Contact your account administrator for more information about which options are available for your account. Or, visit our Plans and Pricing web page for more details on the features included with your plan. Compare eSignature plans & pricing.

Let us know if you need further assistance.


Best regards,

Christopher | Docusign Community Moderator

"Select as Best" below if you find the answer a valid solution to your issue.


Forum|alt.badge.img+2
  • Author
  • Newcomer
  • 2 replies
  • August 19, 2024

Hello @Christopher.Alpizar,


yes that is the guide if followed. I used the docusign developer account for testing purposes.
Everything else seems to be working individually, just not the integration into power pages.


Kind regards

Felix


Forum|alt.badge.img+2
  • Author
  • Newcomer
  • 2 replies
  • August 19, 2024

Something might be wrong with the integration in my environment.

Every guide depicts a description and publisher for the integration, however mine looks like this:


Could this be the cause? Some issue with the integration in my dynamics environment?


Forum|alt.badge.img+14

Hello @FelixNie,

Thank you for reaching back, it would be best to create a case and have a Microsoft specialized support agent review your current configuration to determine the cause and provide you with a proper resolution, the case is needed because Private Identifiable Information might be needed and that information cannot be disclosed in this public forum. To open a support case in the Docusign Support Center, go to the "Get Support" section and select "Open a Support Case". Log in using your Docusign credentials and select a case subject. If you have multiple Docusign accounts, choose the appropriate account to continue. Open a case in the Docusign Support Center. If you’re not able to open a Customer Support case via the above link, you can find below the available phone numbers to contact Customer Support: 

  • Please see the following announcement regarding important changes to
    Docusign Live Inbound Phone Support:
    https://support.docusign.com/s/articles/Upcoming-Changes-to-Live-Inbound-
    Phone-Support?language=en_US

Let us know if you need further assistance.


Best regards,

Christopher | Docusign Community Moderator

"Select as Best" below if you find the answer a valid solution to your issue.


Forum|alt.badge.img

Hi ​@Christopher.Alpizar ,

I am facing issue in Docu sign Integration with power pages, I have done all the steps with configuration and while View and Sign facing below issue. 

Also while investigating this issue I am facing Incorrect Flow ID Issue. 

Any Input and suggestion would be helpful.


Forum|alt.badge.img+5
  • Community Moderator
  • 141 replies
  • April 24, 2025

Hello ​@manjuGurjar,

Thank you for reaching out, and welcome to the Docusign Community! We appreciate your question and assure you that we are fully committed to providing you with the best service possible. 

If you install Docusign as an external app you may refer to these steps. Or you may also check this relevant article for your guidance. Set up DocuSign integration (preview) | Microsoft Learn

Set up DocuSign integration (preview)


[This topic is prerelease documentation and is subject to change.]

Power Pages and DocuSign integration offers an efficient workflow for incorporating e-signatures into multistep forms through a low-code Studio experience. This integration uses the DocuSign connector-based Microsoft Power Automate Flow to enable an end user to view and sign documents. The configuration of these components is through a newly introduced Integrations > External Apps tab in the Set up workspace and allows you to map your specific Dataverse tables to DocuSign. With this integration, you can add an e-signature step to your multistep forms, enabling a streamlined process for capturing digital signatures.

A signed document in a multistep form.

 Important

  • This is a preview feature.
  • This feature currently only works with the standard data model. More information: Enhanced data model
  • Preview features aren’t meant for production use and may have restricted functionality. These features are available before an official release so that customers can get early access and provide feedback.

Integrating DocuSign into your application requires three steps:

Step 1: Install DocuSign. In this step, the site admin installs the DocuSign package consisting of required tables, flows, Dataverse plug-in, and PCF control for the environment.

Step 2: Configure DocuSign. In this step, the site admin or maker configures specific DocuSign credentials and templates.

Step 3: Enable DocuSign. In this step, the maker includes the form and enables e-signatures on the required step for the multistep form.

DocuSign architecture.

Prerequisites

  • Set up a template in DocuSign. The template can contain one or more documents for viewing and signing. The template is assigned a recipient role but doesn't need any name or email association—these fields are assigned from the Power Pages website. The document can include tabs or fields including the signature tab. See DocuSign Template documentation for details or watch this video.
  • You might wish to review how to Configure Power Automate cloud flows in Power Pages (preview) prior to integrating DocuSign with your Power Pages site.
  • Create or identify a Microsoft Dataverse table to use in a multistep form. The table needs to be configured such that Creating a new activity needs to be selected in the Make this table an option when section. More information: How to create and modify Dataverse tables by using the Data workspace.
  • Configure a multistep form using the Dataverse table that has a step to allow users to sign documents. This step displays a subgrid displaying the documents requiring signature. This is configured in a later step.
  • The e-signature integration only works with authenticated users who must have their first name, last name, and email configured in their profile.

Step 1: Install DocuSign

  1. In the design studio, choose Set up > Integrations > External apps.

  2. Select the Install action for DocuSign.

    A screenshot of the Set up workspace in Power Pages design studio with the External Apps menu option selected and the install button for DocuSign emphasized.

The install action might take a few moments. The action changes to configure once the action is complete. This installs a solution, which contains tables, flows, Dataverse plug-ins, and code components to render signed documents.

Step 2: Configure DocuSign

Once you install the DocuSign package, you can begin to configure DocuSign for your Power Pages site.

  1. In the design studio, choose Set up > Integrations > External Apps.

  2. In the Integrations table, select the Configure action for DocuSign. The Enable integration menu displays.

    A screenshot of the Enable integration options inside design studio.

  3. Select the links to resolve the connection references and enable cloud flows in Power Automate, ensuring both cloud flows are turned on.

     Note

    • There are two flows, one that accesses DocuSign and one that accesses Dataverse.
    • Use the appropriate credentials to access DocuSign and Dataverse.
    • For the DocuSign Envelope completed trigger flow, you'll need to select the appropriate DocuSign account ID for the Account setting on the When an envelope status changes trigger.
  4. Return to the Enable integration menu in design studio and select the I have resolved the connection references checkbox.

  5. Select Next, then Close to exit the Enable integration menu.

  6. In the Set up workspace, choose Cloud Flows.

  7. Add the DocuSign Envelope Create and Sign cloud flow from the previous step to this website.

  8. Enter the DocuSign template metadata in the fields provided:

    Expand table

    Value Source
    Template ID DocuSign eSignature website
    Template Name DocuSign eSignature website
    Role Name DocuSign eSignature website
    Table Dataverse table used in the multistep form requiring e-signatures
  9. (Optional) Map the form table fields to the DocuSign tabs in the document.

    A screenshot of the Add a template option inside the Enable integration menu.

Step 3: Enable DocuSign

To enable DocuSign, complete the following steps:

  1. Create a multistep form step for the Dataverse table used in your multistep form process to represent the documents grid.

  2. Add table permissions for the Dataverse table used in the document signature multistep form process (you need at least Create and Write) and assign appropriate web roles. More information: Configuring table permissions

  3. Select the Sync button.

  4. On a webpage, add or edit the multistep form, and create a step entitled Sign Document (or similar). More information: Add a multistep form

  5. Proceed to Step settings.

  6. Select Integrations.

    • Choose the correct template to associate with the form.

    • Enable the form toggle for e-signature.

      The step settings options inside of the Set up workspace in Power Pages design studio.

       Note

      You must open the form to give permission to authenticated users.

    • A subgrid is automatically added to the form step that lists the documents that are to be signed.

  7. Preview and test your webpage. You should be able to open the document, e-sign the appropriate fields, exit, and return to the multistep process.

If you found the response to be a useful solution to your question, please mark it as the best answer by clicking “Select as Best” to make it easier for other users to find. Thank you!


Best regards,

Ma. Cassandra | Docusign Community Moderator

"Select as Best" below if you find the answer a valid solution to your issue